Dygma Raise- World's most advanced gaming keyboard
Created by Luis Sevilla
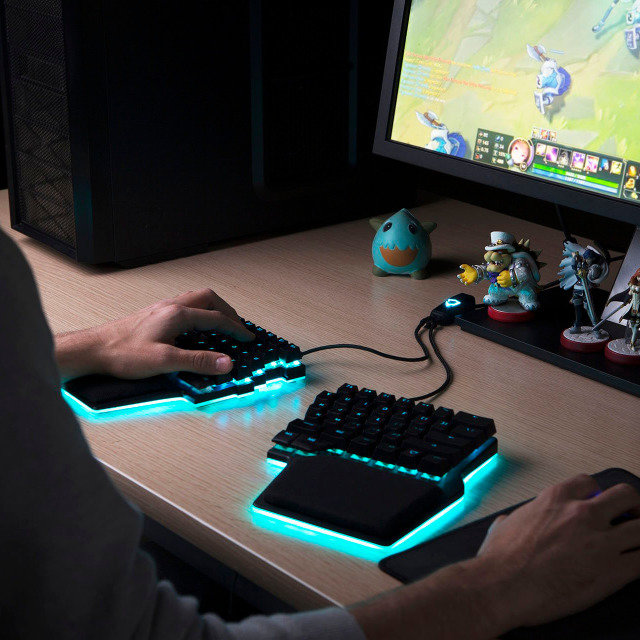
Dygma Raise is an ergonomic keyboard designed to increase gamers' performance, health and comfort.
Latest Updates from Our Project:
Sun Dec 1 '19 Announcement
over 6 years ago
– Sun, Dec 01, 2019 at 05:57:58 AM
Hello backers!
ShippingUpdates
In our last update, we said that we had just finished doing Step 4 of the assembly process, which meant that all the keyboards and all other components had been put in their travel cases.
Afterwards, the factory did the OQC, which is the Outgoing Quality Control check and opened up a few keyboards and did the final tests on the switches, keycaps, and cables.
Last week they started doing Step 5, which is packing all your keyboards, along with the extra components, in the boxes.
This has been taking a while as the assembly factory would only pack 200 keyboards a day due to the fact that they also had to work on other products, apart from the Raise.
But the good news is that we are already going to send the non-EU pre-orders to the shipping company on Monday, Dec. 2, 2019. Once there, the shipping company will organize the orders and ship them asap.
For our EU customers, we will first ship the keyboards to Spain and ship from here. We said this in one of our previous updates. We want to avoid any problems that might arise in EU customs so we believe this is the best solution.
We don't have the exact dates of when you'll receive your keyboards but you will be notified once the product has already been dispatched by the shipping company and you will receive a tracking number ?
If you want to learn more about the Assembly Process, here’s a video of us explaining the 5 steps and our experiences being in the assembly line.
Once the keyboards are with the shipping companies, we will have a better estimation of when the keyboards will arrive at your doorstep.
At this stage, we want to advise everyone to not change their shipping addresses anymore because it might cause confusion and possible delays.
Configurator Software Updates
We finally decided on a name for the Raise’s configurator software.
BAZECOR, the official configurator software of the Dygma Raise.
For the last few months, we’ve been working a lot on the UI and aesthetics of the program. There are many small changes such as text and button alignments and sizes, and rearranging elements that don’t seem as important but improve the overall user experience.
Bazecor is still in Beta, but it’s already functional and we hope the UX is not confusing. After we deliver all the keyboards, we hope you guys give us feedback so we can continue improving it.
Below you will see a few GIFs just to show you a bit of how it looks and works. If you’re wondering about the layout, this is the one our CEO Luis “Deilor” Sevilla has been using for close to a year.
Menu & Black mode
We’ve restructured the menu tab and modified their functions. You can also see the dark mode in this GIF.
Language selection
We’ve finished creating the layouts for all the keycap languages we offer. We hope that this makes configuring your Raise more straightforward.
If the selected keyboard language in Bazecor and the keyboard layout match the one in your operating system, then configuring your Raise will be easier. All key configuration options will match.
Just have in mind that selecting this option won’t change the language of your operating system, just the layout you see in Bazecor.
Underglow and backlight
In the previous versions we had 2 tabs, Layout Configurator and Colormap Editor. We’ve merged both so there are fewer clicks needed to set up whatever you want.
We moved the color selection to the right side of the screen and added 2 buttons (UNDERGLOW and BACKLIGHT) so now it’s easier to change the color for the entire Underglow and all the Backlights. Again, trying to reduce the number of clicks needed.
Responsiveness
There were some issues with some resolutions. Now it’s all solved.
As stated above, Bazecor is in working progress. We hope that you like the direction we are heading with it and you give us feedback so we can continue improving it.
My Raise Page
We are also working on the My Raise Page where you will find all the information about the Dygma Raise, all the How To’s, and instructions on using the software, creating layouts, etc.
Here’s a sneak peek of what we have so far.
Thanks for reading our updates guys!
We will inform you as soon as possible about the shipping dates once we have more information.
Mon Nov 18 '19 Announcement
over 6 years ago
– Mon, Nov 18, 2019 at 03:19:56 AM
Hello again backers,
We are already packing for shipment!
Yes, we are very close to shipping all of your keyboards!
The assembly factory has already finished packing all the remaining keyboards. What we mean by packing is that they’ve done Step 4 of the Assembly Process.
What are the steps in the Assembly Process?
Step 1 - Glue the joint cover to the base, insert the magnets, test the PCBSs, flash the Neuron’s PCB, screw the PCBA to the top metal panel, attach the metal pins, then screw the low-profile PCBs to the base.
Step 2 - Assemble the Neuron: attach the top metal cover to the plastic base, mount the switches to the Raise, then do a function test.
Step 3 - Test the Neuron, test the left side and the right side of the keyboard, then mount the keycaps.
Step 4 - Attach the mylar sticker to the bottom of the base, attach the rubber feet, do one last function test, clean everything. Then, put all the components (such as the palm pads, the extra test switches, cables, user manual, Dygma stickers ?into the travel case.
Next week...
Next week they will begin doing the OQC, the outgoing Quality Control Check, of all the keyboards. They will randomly select a number of keyboards, unbox them from the travel case, remove all components, and do rigorous tests to the switches, keycaps, and cables.
This will be the final check.
After the OQC, the fun begins… packing the keyboards in boxes, along with the extra components, and getting them ready for shipment ?
Last-minute issues detected with the white and black ABS keycaps
The ABS keycaps are the Spanish, French, German, Japanese, and Nordic keycaps.
White ABS keycaps
The white ABS keycaps that we received from our supplier was not to our standards.
In the heat of the battle during assembly, we thought they were fine. But once we checked them again here in Valencia, we realized they weren't.
The letters on the keycaps felt rough to the touch. There were some issues with the paint. The illumination wasn’t as intense. Overall, it didn’t meet our requirements.
Legends on the keycaps aren’t smooth and are rough to the touch
Creating white laser-etched ABS keycaps is difficult. That’s actually one of the reasons you won’t easily find high-quality white ABS keycaps. They’re hard to produce simply because of how they’re made. They first need to be painted in grey. Then in white. This is so the light doesn’t shine through the white paint. They are then laser-etched.
We wanted our white ABS keycaps to look similar to the PBT ones. But we’ve come to realize that with our current supplier, that’s impossible.
ABS keycaps on the left compared to PBT keycaps on the right
The light illuminated through the ABS keycaps aren’t as intense
Black ABS keycaps
The black ABS keycaps were too shiny compared to the ones we had accepted before.
How did this happen? When they make ABS keycaps, they first paint the keycap in black then laser-etch them. After that, they applying a UV coat that will protect the keycap.
Unfortunately, the factory allowed too much exposure to the UV light which resulted in a shinier appearance to the keycap. This was something we weren’t 100% satisfied with.
In China, it looked fine. But we only noticed it more clearly now in Valencia with some of the final Raise units that Manel brought back.
Shiny ABS keycaps
ABS keycap (left), PBT keycap (right)
We had two options.
Stop the shipping, open all keyboards with ABS keycaps, throw them in the bin and start looking for a better supplier. But that would have meant another delay, and this one much longer.
The second option was to accept the mistake and try to make the best out of what we have right now and not delay the shipment. Because these keycaps didn’t meet our standards, we've decided to ship a free PBT keycap set (with the UK English language) for everyone who bought ABS keycaps. That was already part of the deal for our Kickstarter and Indiegogo backers, but not for our website pre-orders.
We are sorry these keycaps don't meet our standards, but we hope that you are happy with the PBT ones.
*What are the differences between ABS and PBT keycaps? Watch our video here.*
So for those who pre-ordered ABS keycaps (Spanish, French, German, Nordic, and Japanese keycaps), you will have PBT keycaps (UK English keycaps) mounted on your Raise keyboard. The ABS keycaps will be in a separate case.
And that's it.
We have more to tell next week!
We will update you as soon as possible once we start shipment.
Thanks for reading!
- Dygma Team
Tue Nov 12 '19 Announcement
over 6 years ago
– Tue, Nov 12, 2019 at 05:16:52 AM
Continuation of the Tales from the Factories.
TALE 8. The Functional Test Paranoia
The mass production assembly was scheduled on October 22 at 2pm. We were prepared to assemble 500 units. The bases were ready and all PCBs were tested and prepared.
At 10:00 am that day, I had spare time and decided to do a user test with some of the pre-production units. I selected 4 keyboards and tested them with my laptop, typing with them for about 30 minutes.
They all failed.
The keyboards kept disconnecting. After 2-3 minutes of typing, they would fail. I PANICKED!
I called our consultant in the assembly factory and showed him.
We tried different things to fix the problem. But unexpected things started to happen: one side would stop working, the LEDs would flash when the color layer was changed, the Neuron would disconnect and reconnect.
We tried changing the cables and changing the Neuron. The results were varied. Some keyboards worked for 10 minutes, some failed, some worked 100%.
I asked Frank to take his computer and do the same tests I was doing. He did, and nothing failed. His laptop didn’t have the same OS as mine.
I thought it could be related to that. We then tested the keyboards with a Mac computer and they didn’t fail.
Then I remembered I have been having problems with my computer in the last few weeks. The batteries would die after 10 minutes without power. And I would hear strange noises inside it when carried as if something was loose inside.
I unplugged the charger from the laptop and then, all the keyboards worked fine! FML ?
Then we started doing the mass production assembly. After assembling 150 units, I decided to take 10 units and do an intense test.
I discovered something very strange. On the left side, some of the LEDs were emitting the wrong colors.
I didn’t understand why. It only happened when I connected the Neuron first then connected the sides of the keyboard.
I called Matt early in the morning and prepared some videos and photos for him to see the problem I was going crazy about.
He called 15 minutes later and told me what the problem was. The ANSI-ISO detection wasn’t working properly. It was a firmware bug.
He changed the code. We flashed the Raise. The problem disappeared. We then flashed all the Neurons again before packing. Now all the units are working fine.
LEARNINGS:
Find the right person to manage and take care of that person. Like any human relationship, you need respect and trust. If you don’t respect or trust them, then it’s best to look for another person for your team.
Communication is the key. Never leave the room if you don't understand what is going on.
The key thing is to know what is next and what to do if things fail.
-----------------------------
There are still more stories to be told from the mass production of the Raise.
All in all, it’s been a great learning experience for all of us. We’re certain that in the next batch and in the next product, we will be able to face the difficulties with better know-how. But more importantly, we would know what to not and what not to do to prevent these issues from happening again.
Currently, we are still packing the remaining keyboards. We will start shipment once we have all the units ready. As soon as they’re done, you will be the first ones to know!
We’re very close to the end and we’re all very excited to see this through!
Tue Nov 12 '19 Announcement
over 6 years ago
– Tue, Nov 12, 2019 at 05:15:19 AM
Hi everybody,
Manel finally arrived from China this week and he has more stories to tell us about his trip! If you didn’t read the previous update, we talked about the stories and experiences Manel faced during the mass production process in China.
It’s been a tough few weeks but we’re working hard to make sure we deliver your keyboards in the best condition as soon as possible.
Here are the Tales from the Factories.
TALE 6. The Joint Cover Aberration
When we mounted the 2 keyboards, we used the industrial glue to stick the joint cover to the base. It took more time than expected to glue the joint cover with the testing jig but eventually, it fit.
After checking both keyboards, we asked the factory to mount 150 sets for the pre-production. It took so long that we had to delay pre-production one more day.
When 40 units were assembled, we realised that most of them had a defect in the joint cover. The joint covers were bent! We had to stop the assembly line to check the cause of the problem.
We asked the metal factory to send their engineers. They sent their workers and they tried to manually fit the joint cover. It wasn’t successful. The joint covers were too bent.
We found out that the reason was because of the sandblasted finishing done to the joint. Since the joint cover is thin, when they put the finishing, it would bend.
We had a few options but they all had some drawbacks.
Option 1: Do not sandblast the joint cover, but paint them.
Con: The paint was too weak. It would scratch easily.
Option 2: Reduce the sandblasting level.
Con: It would take too much time to do and we can’t wait that long. But we could try for future orders.
Option 3. Keep it as it is, but with better glue and assembly control.
Con: It’s too risky because defects could appear after time or with temperature
change.
Option 4. Do not sandblast the joint cover but anodize it directly.
Cons: Finishing will look shinier and different from the top panel but it will still look good.
We finally made samples of Option 4 and approved it.
Now that the shape of the metal joint cover is better, we can use double-sided tape, which was much better for the assembly line and took less time.
So we decided to mount 10 sets of keyboards with double-sided tape. After 24 hours, they all still worked fine.
We then decided to assemble 500 keyboards. The next morning, ALL left joint covers were defective! They were no longer sticking to the base :(
We had to cancel mass production.
We spent the next hours analyzing the problem. We found that the fit of the left joint cover to the left base wasn’t secure. It wobbled. It was hard to detect at first because it looked totally fine. There was about a 0.5mm gap, but it was big enough to unstick the double-sided tape.
So we called the metal engineer again. He confirmed that the pieces (the sizes of the joint covers) were slightly wrong.
He swore that the fit was perfect before. We had a tense conversation trying to find the problem and who was at fault.
They then tell us that we can use another glue, a stronger one, instead of the original glue or double-sided tape. So we quickly mounted 10 more keyboards using the new glue for the joint cover. Now that the pieces were not sandblasted, it was easier to mount. We had to use small clips to keep everything together while the glue cured. It took another 24 hours for it to finish.
The result was rock solid.
LEARNINGS:
It’s best to push for perfection from the start especially before mass production. I had accepted this piece despite its imperfections for a long time, with the promise from the factories that they would make it better for mass production.
TALE 7. The Transport Case Desperation
The travel case was scheduled to be delivered on the 19th of October.
We received the agreed 200 cases for the pre-production units. We checked them and found there were minor things that needed improvement, like how the elastic strip for test switches was too tight.
We also realised that the weight of the travel case was lighter than the previous sample. The previous sample weighed 550g and the current one weighed 450g!
I got worried and thought the supplier cut corners and gave us a poor quality product. So I started analysing the parts one by one. Everything was fine. The only part that was different was the lid. The material was different but it was sturdy enough so I decided to accept the modification. After all, having a lighter travel case is better.
We then had to wait for the rest of the order.
We should’ve received it on the 21st of October but the travel case factory called us the day before, telling us that everything is prepared except for the foam for the lid.
The foam came from a different supplier and we didn’t know them. They said that the foam supplier had a problem with their machine so they couldn’t ship as scheduled. They even sent us a photo of the broken machine as proof.
We finally received the travel cases 10 days later the scheduled date. Most of them had quality issues in the foam. They didn’t place the foam properly. It was too loose.
The travel case factory had to send their workers over to the assembly factory to work on the travel cases again. It was a long process but they got the job done.
LEARNINGS:
Modifications, no matter how small, will cause a delay.
When you accept the design of a product, it shouldn’t be modified until after the next batch. Even if only one component isn’t ready, don’t start manufacturing.
Despite the delay, communication with this particular supplier was good. Our contact person from this company is a sincere and straightforward person, which made the problem easy to fix.
Mon Nov 4 '19 Announcement
over 6 years ago
– Mon, Nov 04, 2019 at 02:39:03 AM
Happy Halloween everyone!
In line with this week’s holiday season, we thought we’d share with you Manel’s nightmare tales during the mass production process while he has been in China. (We’ll be sharing more of his stories in the next update as well!)
The last few days have been a struggle for us, especially for Manel.
Manel has been in China since the 10th of October. This week was supposed to be the week when we finally ship the keyboards. But alas! Here we are again. Another delay. Don’t worry. Nothing too grave has happened but there were a few quality problems that just piled up and caused a 2-week delay.
The good news is that we’ve already finished packing some of the keyboards, around 350 units, into the travel case. There are still many left to be fully assembled and packed, but Manel and the team in China are pushing through making sure they ship all the units in mint condition as soon as possible.
Speaking to you all the way from China, here are Manel's TALES FROM THE FACTORIES.
TALE 1. The Metal Pin Nightmare
It was my second day China and we were scheduled to mount 4 Dygma Raise keyboards with all its manufacturing pieces. We needed this done in order to check the process properly before doing the pre-production assembly.
After assembling them, I felt that the joint between the two halves was so loose.
I got extremely worried because all the metal pins were already done. I started trying all the different combinations with the metal pins. I even ordered more high precision measurement tools to make sure all metal pins had the same dimensions. I checked the new metal pins and compared them with the approved samples we had so I could find the problem.
But the pins looked exactly the same as the approved samples! So why didn’t it feel the same? Why was the joint loose?
Finally, I found the problem. The electric screwdriver we used to fix the screws was too weak. I had to screw it by hand. Then it worked!
The metal pins were fine.
LEARNINGS:
Don't lose your mind. Just keep looking for the answers until you find them.
The tightness of the screw should be stronger compared to how it was in the past now all the components are more precise.
Our metal pin supplier is reliable. I didn't trust him at first but he did a good job with this difficult piece.
TALE 2: The Pre-production Delusion
October 17 was the day scheduled for the pre-production assembly. That was my birthday. No one knew that. So I was expecting a nice present: 150 units perfectly assembled and ready to be shipped.
But nope! That didn’t happen. Instead, we faced a problem with the joint covers*, so we had to stop the assembly and postpone it.
*We’ll tell you all about the joint cover story in our next update!
I just felt depressed. It was so anticlimactic. I really thought this was finally it, we were finally assembling the keyboards!
We even had a third party QC come that day to be trained to do the quality control process. We trained him anyway but it wasn’t the same to train someone with an unfinished product.
We ended the day with a small celebration in a restaurant. I was still sad that the pre-production didn’t push through but I appreciated the effort of the team here.
TALE 3. The Testing Jig Disaster
Testing the PCBs is a slow process. It takes one day to flash 300-400 PCB sets.
As we were late because of the delay of the right side LED driver, we couldn’t flash them together with the left side.
One day, they called me saying that the testing jig was broken. I panicked.
Worker checking the PCBs and seeing that some keys aren’t working
We didn’t have a spare test jig and making one takes a lot of time. So we drove to the SMT factory. The workers were already making the PCBAs, but they were blocked and couldn’t test and flash them.
We got the testing jig and opened it. I called Matt but at that time it was 4:00am in Spain, so he replied 3 hours later.
We tried all possible solutions. We tried using the testing jig of the Neuron, we replaced parts so we could find what was broken.
Finally, we found out that it was the SD card of the Raspberry Pi that was broken. I talked with Matt and he helped us connect the testing jig remotely. He updated the program using the testing jig of the Neuron. As it wasn’t a hardware problem, it could easily be fixed.
We realised the fragility of our testing process. It was clear that this delay affected the whole production.
LEARNINGS:
We need to create more testing jigs for the future.
PCBs are now working
TALE 4. The PET Case Dilemma
We use PET cases for the extra switches and keycaps.
PET cases with extra switches
In the DVT (Design Validation Test), our PET cases had a clipping mechanism to keep the lid intact. But we decided to remove it for the switch cases because it felt too tight and difficult to open.
When I arrived, I found around 1,000 switch cases with the lids not fitting properly. They were bent.
I told them this wasn’t acceptable. We got into an argument and they suggested that we simply use tape to keep the lid intact. But I was persistent in telling them that this case is supposed to be reusable so our customers could store their other switches in it. They had to redo the entire order.
Now the PET cases are better, the fit is better.
LEARNINGS:
Always be exigent with quality mistakes. Don't accept compromises with quality.
Despite the issues with the metal pins, the joint, the LED drivers, the testing jigs, and the PET case, our smiles remain strong.
We are doing everything in our power to push through. Manel has postponed his flight back to Spain so he can continue working with the factory. It has all been really tough but we’re determined to solve everything and start shipment in the next 2-3 weeks.
As always, thank you for staying fully updated with our developments! We will have more to share next week.